Let’s talk about how to Get Fade Cut. A “Fade Haircut” is a popular men’s hairstyle characterized by a gradual transition from longer hair on top to shorter hair on the sides and back of the head. The key feature of a fade is that the hair length progressively decreases, creating a seamless and polished appearance.
The term “fade” refers to the fading effect where the hair appears to blend from one length to another, resulting in a clean and sharp look. Fades can come in different styles, including low fades, mid fades, and high fades, depending on where the shorter hair starts.
Fades are often combined with various styles on top, allowing for a range of looks, from classic and neat to more contemporary and edgy. This versatility, along with the clean finish, makes fade haircuts a popular choice among men of all ages. To achieve a fade cut, it’s essential to consult a skilled barber or stylist who can tailor the haircut to your specific preferences and style.
How to Do Fade Haircut Step by Step
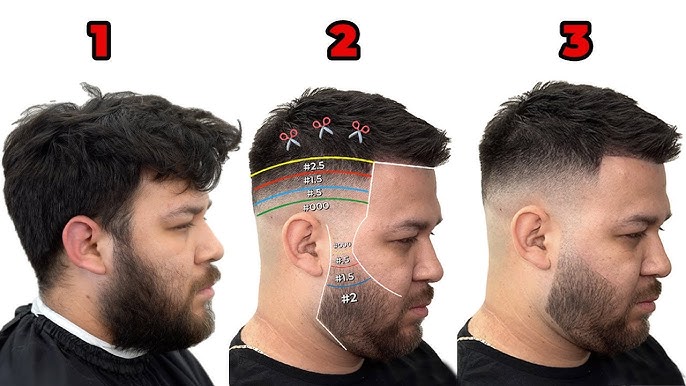
The Fade Haircut is a popular style, also known as a Fade Cut. It is a popular style, achieving a proper fade requires some skill. If you’re attempting to do it yourself, it’s recommended to have some experience with hair cutting and to use the right tools, including clippers with various guard sizes. Here’s a step-by-step guide to doing a basic low fade haircut:
Tools you’ll need:
- Clippers with various guard sizes (e.g., #1, #2, #3, #4 guards)
- Comb
- Hair scissors
- Mirror
- Towel
- Hair cape (optional)
Step-by-Step Guide:
- Prepare the Hair:
- Start with clean, dry hair. It’s essential to work with dry hair for precise cutting.
- Choose the Fade Length:
- Decide on the length for the fade. For a low fade, you’ll typically use a longer guard on the sides and back and leave more length on top.
- Establish a Guideline:
- Create a guideline by using clippers without a guard to define the lowest point of the fade. This is often around the ear area, but it can vary based on your desired style.
- Start with the Longer Guard:
- Attach a longer guard to your clippers (e.g., #4 or #3) and begin trimming the hair on the sides and back, working your way up from the guideline. Keep the clippers parallel to the head for an even cut.
- Switch to a Shorter Guard:
- Gradually switch to a shorter guard (e.g., #2 or #1) as you move higher up the head. Ensure that you blend the shorter length into the longer length without creating a distinct line.
- Blend the Fade:
- Use different guard sizes (e.g., #2, #1) to blend the shorter length into the top hair, ensuring a seamless transition. This may require using a flicking motion with the clippers or a technique known as “scissor over comb” to achieve a smooth gradient.
- Detail Work:
- Use a comb and scissors to trim and blend the hair around the crown and the top of the head.
- Style the Top:
- Style the top hair to your preference using scissors, clippers, or styling products. The style on top can be short or long, depending on your choice.
- Check for Symmetry:
- Throughout the process, check for symmetry by comparing both sides of the head in a mirror.
- Final Touches:
- After completing the fade, make any necessary adjustments and detail work. Clean up any stray hairs around the neck and ears.
- Clean Up:
- Remove the hair clippings and clean your clippers and tools.
- Evaluate and Style:
- Evaluate your haircut in different lighting conditions and make any additional adjustments if needed. Style your hair as desired.
Keep in mind that achieving a perfect fade takes practice and patience. If you’re new to cutting hair, it’s advisable to start with a simple haircut and gradually work your way up to more complex styles.
How to Get Fluffy Fade Cut
Achieving a “Fluffy Fade Cut” involves creating a haircut that combines a stylish, voluminous look on top with a gradual transition from longer hair to shorter sides and back. Here’s a general guide to getting a fluffy fade cut:
Tools you’ll need:
- Clippers with various guard sizes
- Comb
- Hair scissors
- Mirror
- Towel
- Hair cape (optional)
Step-by-Step Guide:
- Prepare the Hair:
- Begin with clean, dry hair. Dry hair allows for more precise cutting.
- Choose the Fade Length:
- Decide on the length for the fade. For a fluffy fade, you’ll want to maintain more length on top, and the sides and back should gradually become shorter.
- Define the Guideline:
- Create a guideline by using clippers without a guard. This guideline will define the lowest point of the fade, typically around the ear area.
- Begin Fading:
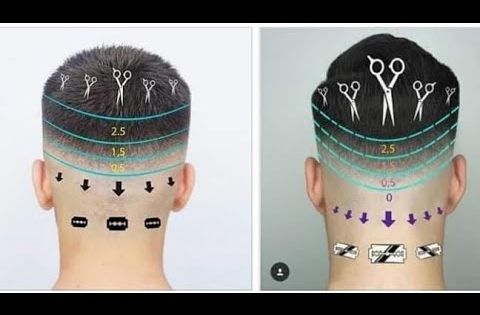
- Start with a longer guard on the clippers (e.g., #4 or #3) and trim the hair on the sides and back, working your way up from the guideline. Keep the clippers parallel to the head for an even cut.
- Switch to Shorter Guards:
- Gradually switch to shorter guard sizes (e.g., #2 or #1) as you move upward on the sides and back. The goal is to create a gradual transition from longer to shorter hair without any harsh lines.
- Blend the Fade:
- Blend the shorter length into the top hair using different guard sizes, like #2 and #1. This blending process should be seamless, ensuring a smooth gradient from long to short.
- Style the Top for Fluffiness:
- Focus on the top of the head and use scissors to trim and texturize the hair. The goal is to achieve a fluffy, voluminous appearance. This may involve point-cutting, thinning shears, or other texturizing techniques to add volume and movement.
- Detail Work:
- Use scissors, clippers, or other tools to make any necessary adjustments and detail work on the entire head.
- Check for Symmetry:
- Regularly check both sides of the head in a mirror to ensure symmetry and evenness.
- Final Touches:
- After completing the fade, make any additional adjustments as needed, including cleaning up the neck and ear areas.
- Styling:
- Style the top to achieve the desired fluffy look. You can use a hairdryer, volumizing products, and styling techniques to add volume and texture.
- Clean Up:
- Remove hair clippings and clean your tools.
Remember that creating a perfect fluffy fade cut may require practice and patience.
How to Get Curly Fade Haircut (Barber Tutorial)
How to Get Messy Fade Haircut (Video Tutorial)
Fade Cut Low Taper Tutorial
Fade Cut Low Burst Fade Haircut Tutorial
Drop Fade Haircut Tutorial
Fade Cut Modern Mullet Tutorial
How to Get Fade Haircut for Straight Hair (Video Tutorial)
Fade Haircut Memes
How to Ask Barber for Fade Cut
When asking your barber for a fade haircut, it’s essential to communicate your preferences clearly so that you get the style you want. Here are some steps to help you ask your barber for a fade cut effectively:
- Research and Inspiration:
- Before your appointment, gather some visual references. Look for pictures or examples of the specific fade style you want. This can help you and your barber have a common understanding.
- Know the Type of Fade:
- Understand the type of fade you want. Fades come in different styles, including low fades, mid fades, high fades, skin fades, and more. Be clear about which one you prefer.
- Determine the Fade Length:
- Decide how long or short you want the fade to be. Communicate whether you want the fade to start higher up on the head or lower around the temple and ear areas.
- Top Length and Style:
- Be specific about the length and style you want for the hair on top. Let your barber know if you want it longer, shorter, textured, or a particular style.
- Transition Area:
- Discuss how you want the transition from longer to shorter hair to look. Ask if you prefer a more gradual or subtle fade or if you want it to be more abrupt.
- Tapering Details:
- Talk about any additional details, like tapering around the neckline and sideburns. Indicate whether you want a defined, sharp line, or a more natural, blended look.
- Texture and Styling:
- If you want a particular texture or styling for the hair on top, mention it. Some fades are styled with gel, pomade, or other products to achieve a certain look.
- Communicate Clearly:
- Use specific terminology and describe your preferences in clear, concise language. For instance, you can say, “I’d like a mid fade with a skin taper, a short crop on top, and a textured, messy style.”
- Ask for Recommendations:
- Your barber is a professional, and they can provide guidance based on your hair type and face shape. Don’t hesitate to ask for their recommendations or input.
- Be Open to Suggestions:
- While it’s important to communicate your preferences, be open to your barber’s suggestions and advice. They can help ensure that the style you want suits you.
- Ask Questions:
- If you’re unsure about anything, don’t hesitate to ask questions for clarification. It’s better to have a clear understanding before the haircut begins.
- Visual Check:
- As the haircut progresses, check in the mirror to ensure you’re satisfied with the direction it’s taking.
Remember, clear communication is the key to getting the fade cut you desire. Your barber’s experience and expertise, combined with your preferences, will help you achieve he look you want.